
![]()

![]()
Kowainik Git Workflow Helper Tool.
You can find the description of the workflow here:
hit-on provides the hit binary with a convenient command-line interface to improve the interaction with git in a compatible way with the described working methods. It saves time for people who use this workflow on a daily basis, helps beginners expand their insight of the core VCS processes and makes collaboration between team members easier during development.
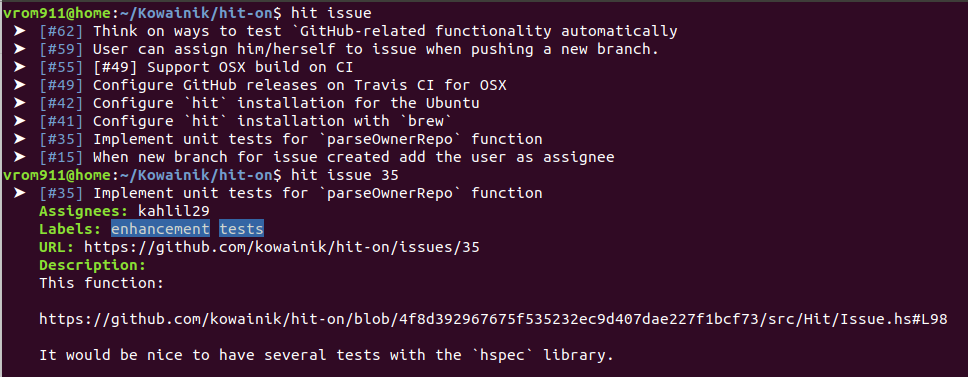
Here is an example of how you can see the list of issues and the issue description with hit:
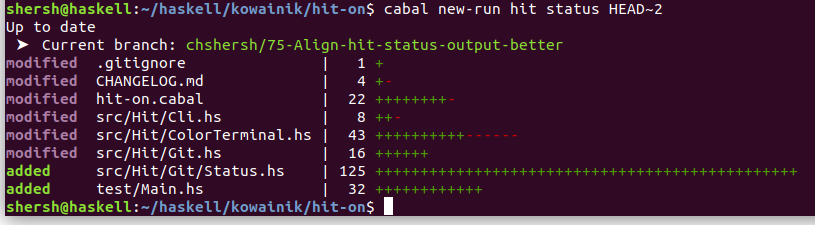
Or how you can see pretty short stats about your changes:
Getting started🔗
Prerequisites🔗
To start using hit make sure that you have the following tools installed on your machine:
git—hitis a wrapper aroundgithub– to make PRs to GitHub directly.- Optional:
diff-highlight— for pretty output of thehit diffcommandLinux installation instructions
cd /usr/share/doc/git/contrib/diff-highlight/
sudo make
sudo chmod +x diff-highlight
sudo ln -s diff-highlight /usr/local/bin/diff-highlight
Installation🔗
There are several methods to install the hit tool. You can choose the one that you are most comfortable with.
Download from releases🔗
You can download the hit binary directly from the GitHub releases:
After downloading, make it executable and copy it to a convenient location, for example:
chmod +x hit-linux
mv hit-linux ~/.local/bin/hit
Build from source🔗
NOTE: the project is written in Haskell, so you need to have one of the Haskell build tools installed. See this blog post for installation and usage instructions.
You need to follow these steps:
Clone the repository from GitHub
git clone https://github.com/kowainik/hit-on.gitStep into the directory
cd hit-onInstall the project with one of the build tools
- Cabal
shell cabal new-install hit-onNote: make sure you have~/.cabal/binin your $PATH - Stack
shell stack install hit-on
Make sure that
hitis installed:hit --version
macOS package manager🔗
Currently, this method of installation is not supported. See this issue for more details or if you want to help.
Ubuntu package manager🔗
Currently, this method of installation is not supported. See this issue for more details or if you want to help.
Setting up🔗
Follow the steps below to configure hit :
- Enable autocompletion by calling the following command:
shell source <(hit --bash-completion-script `which hit`)Add it your personal config file (like~/.bashrc) to enable automatically. - Specify your GitHub login in the global
.gitconfig
git config --global user.login <your_login>- This step is only required if you want to use
hitwith private repositories.Create OAuth token on GitHub. The following scopes for the token should be specified:
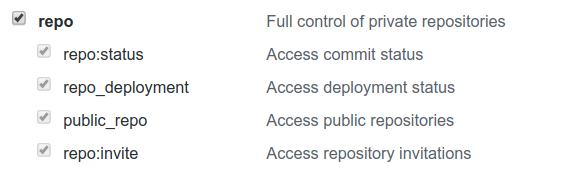
Copy the generated token.
Export token as an environment variable
shell export GITHUB_TOKEN=<paste_generated_token_here>
Commands🔗
| Command | Description |
|---|---|
| hop | Switch to branch and sync it |
| fresh | Rebase current branch on remote one |
| new | Create new branch from the current one |
| stash | Stash all local changes |
| unstash | Unstash previously stashed changes |
| commit | Commit all local changes and prepend issue number |
| uncommit | Reset to the previous commit saving the changes |
| fix | Fix requested changes to the last commit |
| amend | Amend changes to the last commit and force push |
| issue | Show the information about the issue |
| push | Push the current branch |
| sync | Sync local branch with its remote |
| resolve | Switch to the main branch, sync and delete the branch |
| clear | Remove all local changes permanently |
| current | Show info about current branch and issue (if applicable) |
| status | Show current branch and beautiful stats with COMMIT_HASH (by default HEAD) |
| diff | Display beautiful diff with COMMIT_HASH (by default HEAD) |
| clone | Clone the repo. Use ‘reponame’ or ‘username/reponame’ formats |
| log | Outputs the log of the current commit or COMMIT_HASH |
| tag | Create or delete the specified tag TAG_NAME |
Usage🔗
The best way to demonstrate the power of the hit tool on a day-to-day basis with our workflow is to go through the entire workflow step by step, solving an ordinary problem of the typical git user.
Here we assume that you work with
originremote.
hit clone🔗
If you don’t have the repository locally, you need to clone it. With the git tool you would need to specify the full URL which you can get from the repository GitHub page.
git clone git@github.com:username/project-name.githit can simplify this process a bit. If you want to clone the project which is under your GitHub username you can write:
hit clone my-projectIf this is not your personal repository then you can use clone command in the following way:
hit clone owner-name/project-namehit hop🔗
When you want to start working on a new issue, you usually want to make sure you’re using the latest version of your project. As a git user you may use the following commands:
git checkout main
git pull --rebase --prune
With hit you can just:
hit hophit issue🔗
Now you need to decide which issue you want to work on. You can use the hit issue command to see the full list of all open issues. After choosing the number of the issue, let’s say 42, call hit issue 42 to see the details of that issue.
hit new🔗
Start your work in a new branch. According to our workflow, branch names should have the following form:
<user_login>/<issue_number>-<short_issue_description>With git you can create a branch using the following command:
git checkout -b my-login/42-short-deschit allows you to accomplish this task in an easier manner:
hit new 42It uses the issue title to generate a short description.
hit status🔗
Before commiting your changes, you may want to inspect short stats about your work. With git you usually call the following command:
git statusHowever, the same hit command produces better output:
hit statushit diff🔗
If you want to see detailed diff of your changes, use hit diff command. If you have diff-hightlight installed then hit diff outputs much nicer diffs.
hit commit🔗
After finishing your work on that issue, you need to commit your changes. With git you would do the following:
git add .
git commit -m "[#42] Implement my feature

Resolves #42"
With hit you need only to specify the text of the commit to get the same result:
hit commit "Implement my feature"or even simplier:
hit commitAnd the commit name would be the title of the corresponding issue at GitHub (if you are currently in the branch named as described above).
Note that you don’t need to keep in mind the current issue number. However, if you want to refresh the context about the issue, use the hit current command.
hit push🔗
After committing your changes locally, you need to push them to the remote repository. It’s usually a good practice to push only the current branch.
The git command for this is a little bit verbose:
git push -u origin my-login/42-short-deschit allows you to save several keystrokes:
hit pushNote:
hit pushcommand can be combined with thehit commitcommand using-p|pushflag in the latter command.hit commit --push
hit sync🔗
After opening the pull request, some of the reviewers suggested changes that you applied as commits to the remote branch via GitHub interface. Now you need to sync your local branch with the remote one.
With git you can do the following:
git pull --rebase origin my-login/42-short-descHowever, with hit you can just:
hit synchit fresh🔗
While you were waiting for the second round of reviews, another pull request was merged to the main branch. Now you need to apply the new main changes to your local branch.
With git you can do the following:
git fetch origin main
git rebase origin/main
Again, with hit you can do better:
hit freshhit fix🔗
Now you need to make changes to your work locally according to the code review and push them to the remote repository.
git requires from you to do several steps to accomplish this simple task:
git add .
git commit -m "Fix after review"
git push origin my-login/42-short-desc
hit helps you with this as well:
hit fixhit amend🔗
Oops, you’ve just realised that you have made a typo in your work! So you fixed the typo. But now you want to update the remote branch without creating a new unnecessary commit.
With git you can do the following:
git commit -a --amend --no-edit
git push origin my-login/42-short-desc --force
With hit you can simply:
hit amendhit resolve🔗
Hooray, your PR just got merged! It’s time to clean your local repository and start working on a new issue!
With git you would do the following:
git checkout main
git pull --rebase --prune
git branch -D my-login/42-short-desc
With hit you can finish your work faster:
hit resolvehit log🔗
Hooray, your PR just got merged! It’s time to clean your local repository and start working on a new issue!
With git you would do the following:
git log --oneline --decorate [COMMIT_HASH]With hit you can finish your work faster:
hit log [COMMIT_HASH]Troubleshooting🔗
If you see
$ hit hop
fatal: ambiguous argument 'origin/HEAD': unknown revision or path not in the working tree.
Use '--' to separate paths from revisions, like this:
'git <command> [<revision>...] -- [<file>...]'
hit: readCreateProcess: git "rev-parse" "--abbrev-ref" "origin/HEAD" (exit 128): failed
  origin/master
...skipping...
then you can run
$ git remote set-head origin -ato synchronise with the remote, fetch and set origin/HEAD locally.
Acknowledgement🔗
Icons made by Freepik from www.flaticon.com is licensed by CC 3.0 BY.