Haskell has a stigma of having poor or no documentation at all. Though more and more maintainers are doing a hell of a job to improve the quality of their libraries and applications, it is still not enough. We need to strengthen our vision of documentation collectively and as a consequence, master the existing tools for doing that.
There are different types of documentation. Today we want to talk about API and libraries documentation inside your library, and accordingly about Haskell gear for that – Haddock.
The blog post is going to give Haddock overview, suggest documentation best practices, reveal the specialities of the Haddock tool, and show-and-tell lots of different examples of how to squeeze more out of your documentation. It should be interesting to library maintainers, developers who want to improve their documenting skills and everyone interested in documentation techniques in Haskell.
What is Haddock🔗
Haddock is the Haskell way to document exposed API of your library or application. Writing special comments alongside your code helps to keep code and documentation synchronised and up-to-date (as outdated documentation is a painful problem to deal with). It also makes the docs comfy both for maintainers and users. And Haddock provides precisely that. Haskell is not always beginner-friendly, so giving a helping hand to users of your code in a convenient way is greatly appreciated.
You write documentation using the special Haddock markup language right near the structures you want to document, and it can be rendered to different formats, including styled HTML, that could be viewable later on Hackage, Stackage or even locally. Moreover, if you upload your library to Hackage or Stackage, Hoogle will search for definitions by name or type across all packages, including yours.
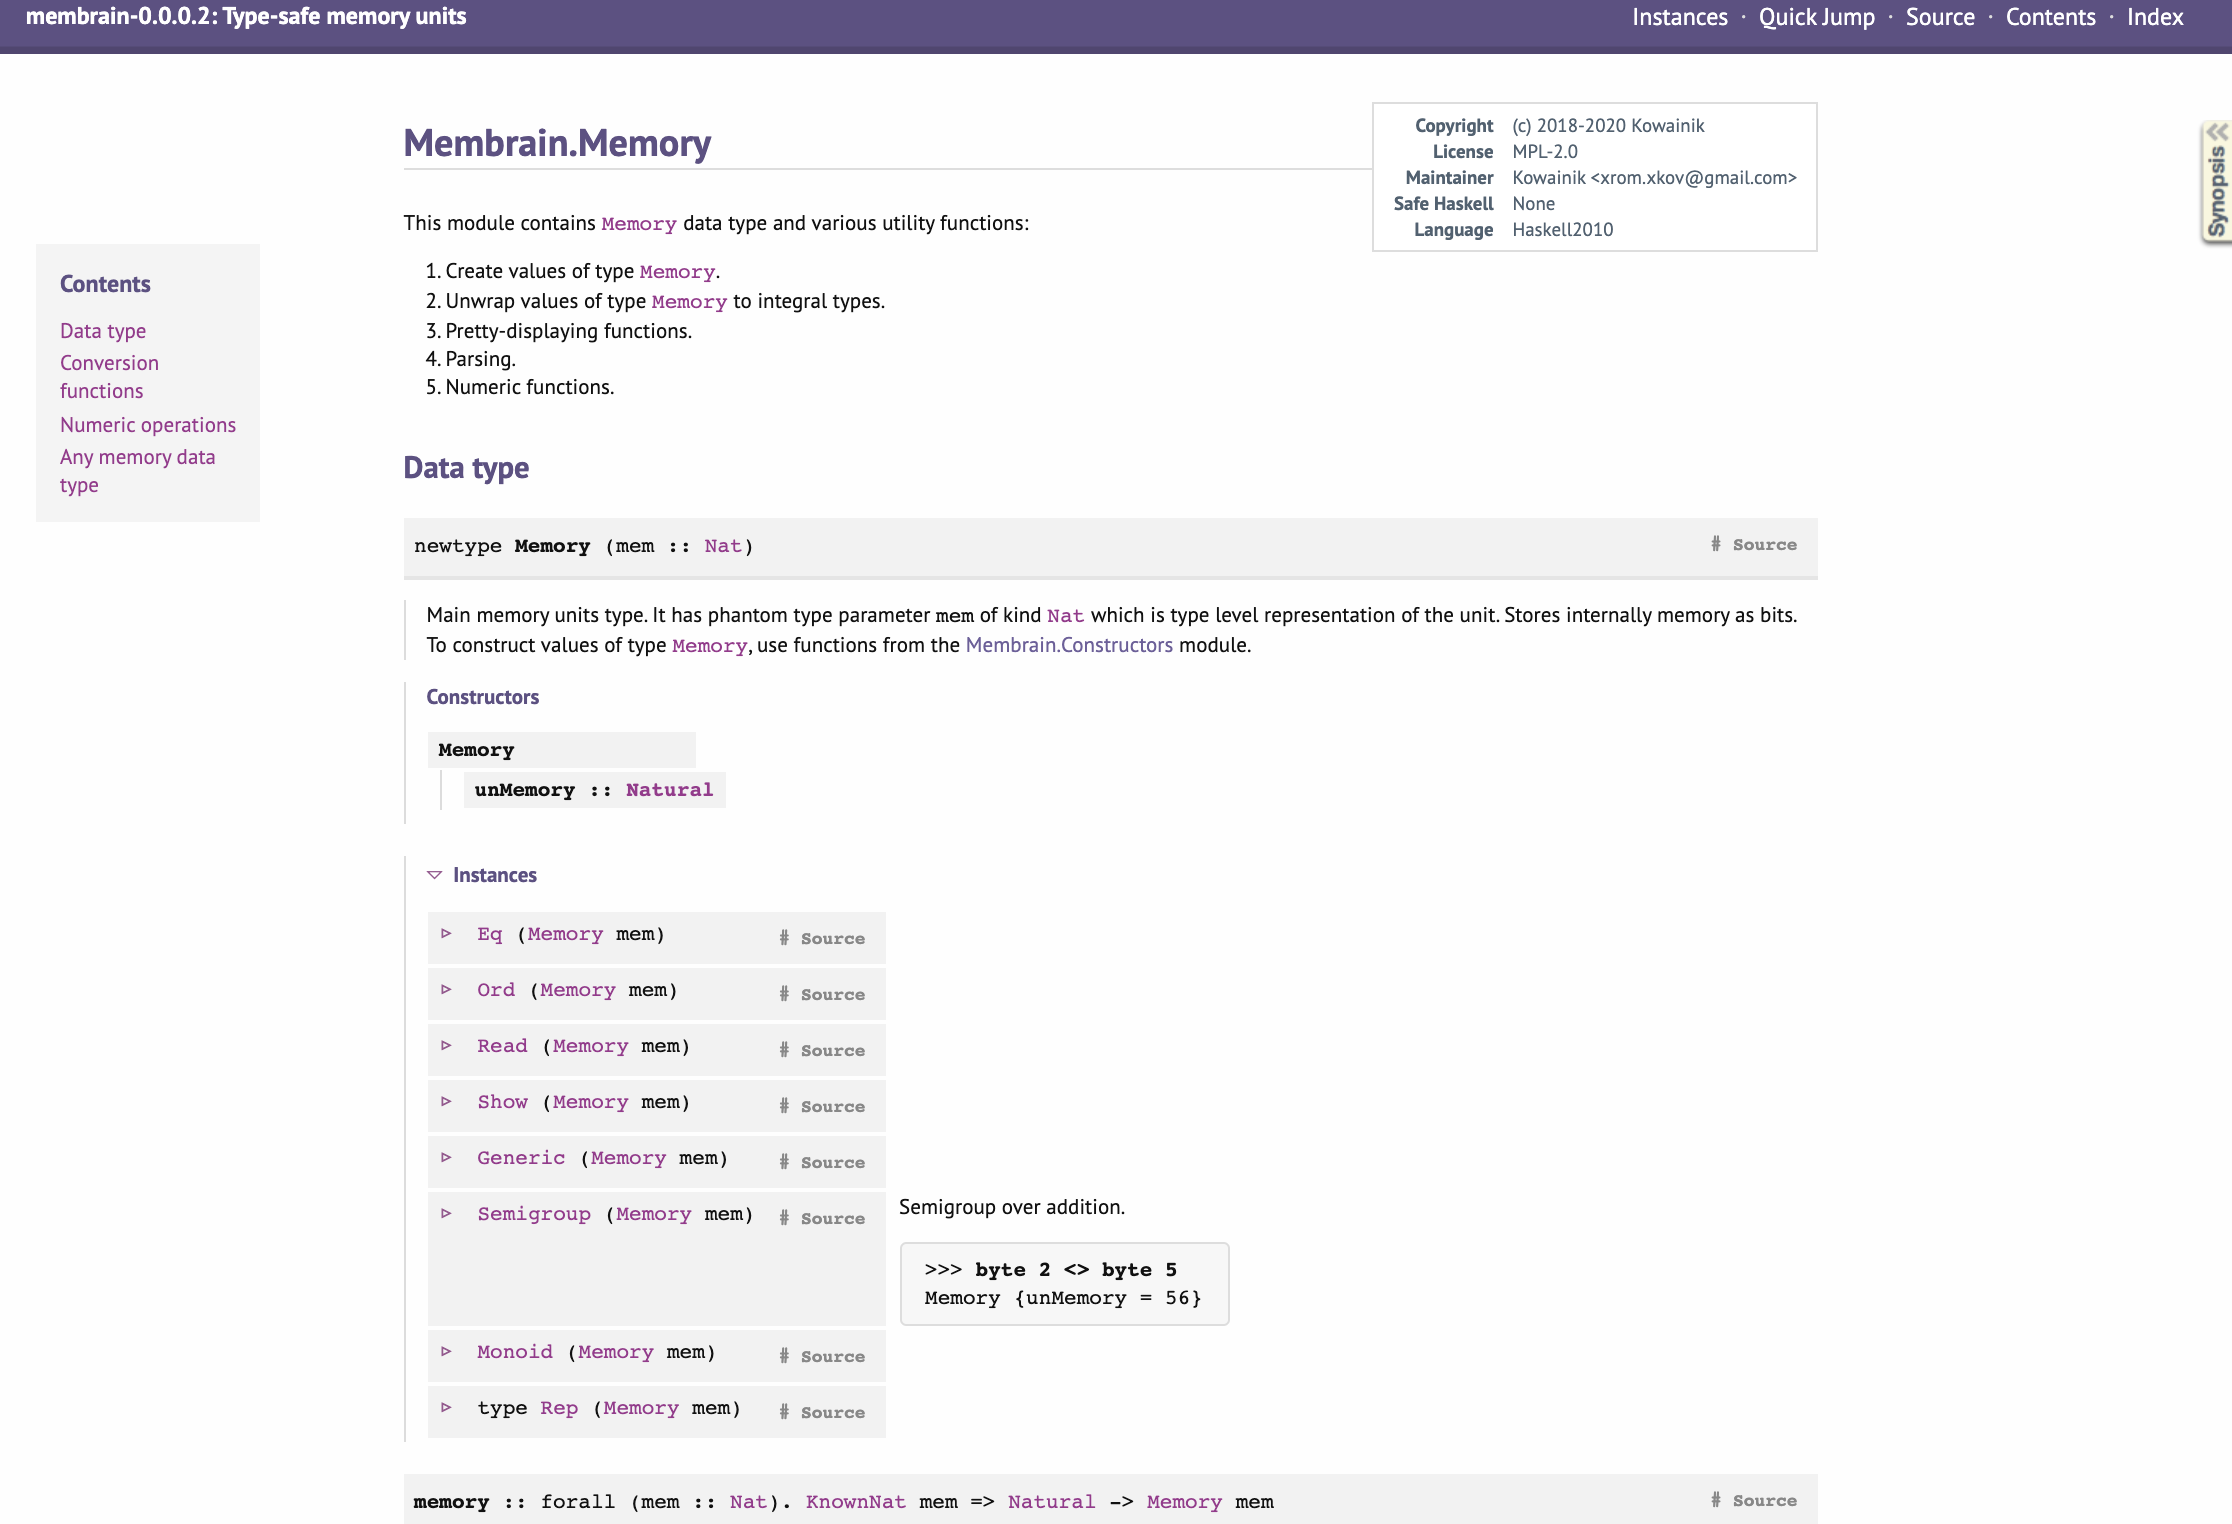
Here is how a typical Haddock documentation page for a module looks like:
To produce the documentation, Haddock needs to build the project first because it uses build-time information. But you don’t need to worry about it usually, because build tools do that automatically when you ask them to output documentation.
Comment to Document🔗
Haddock is written in Haskell comments with the special annotations. There are two types of Haddock marked comments – pre- (starting with the | symbol) and post-comments (starting with the ^ symbol), which means that Haddock comments could be put right before or after the function/type/class definitions.
-- | I am the 'foo' function's Haddock pre-comment.
foo :: Int -> Int

bar :: Int -> Int
-- ^ I am the 'bar' function's Haddock post-comment
For multi-line Haddock comments you can use either per-line or block style comments for both pre and post types. The special Haddock symbol needs to be added just to the first line of the multi-line comment, and Haddock will consume following lines until the first non-comment line.
-- | This is multiline
-- per-line Haddock pre-comment
foo :: Int -> Int


bar :: Int -> Bool
-- ^ Another per-line Haddock
-- post-comment

{- | Multiline Haddock
block pre-comment
-}
baz :: Double -> Text
If you write multi-line comments in your code, we strongly advise using block comments by default over per-line ones because of the number of reasons:
There are fewer chances to lose part of your documentation due to the extra newline with multiline comments syntax, unlike per-line comments. Remember, that Haddock consumes comments marked as documentation until the first non-comment line, and a newline without
--separates such comments into ordinary independent groups.-- | I am a normal line of documentation. -- I will be in the docs too. -- I am not going to make it due to the missing @--@ in the previous line. foo :: IntAs a consequence, it’s impossible to have conditional documentation chunks under the C Preprocessor (CPP) pragmas when using the
--style of comments, as CPP pragmas are stripped to empty lines.Multiline comments contain less noise (no
--on each line), making it easier to read and update.They are more suitable for inserting/copying/updating code snippets quickly.
They also occupy less space horizontally on average, because you don’t waste 3 characters on each line.
What can be documented🔗
Generally, Haddock documents the exposed API of your Haskell libraries and applications.
More specifically, Haddock can be applied to document the following parts of the Haskell code:
- Top-level module headers
- Type definitions:
data,typeandnewtype - Constructors and fields
- Typeclasses —
classdeclarations - Typeclasses methods
- Instances
- Derived typeclasses
- Top-level functions
- Arguments and return results of functions
- More exotic top-level definitions:
pattern,type family,data family,type instanceanddata instance
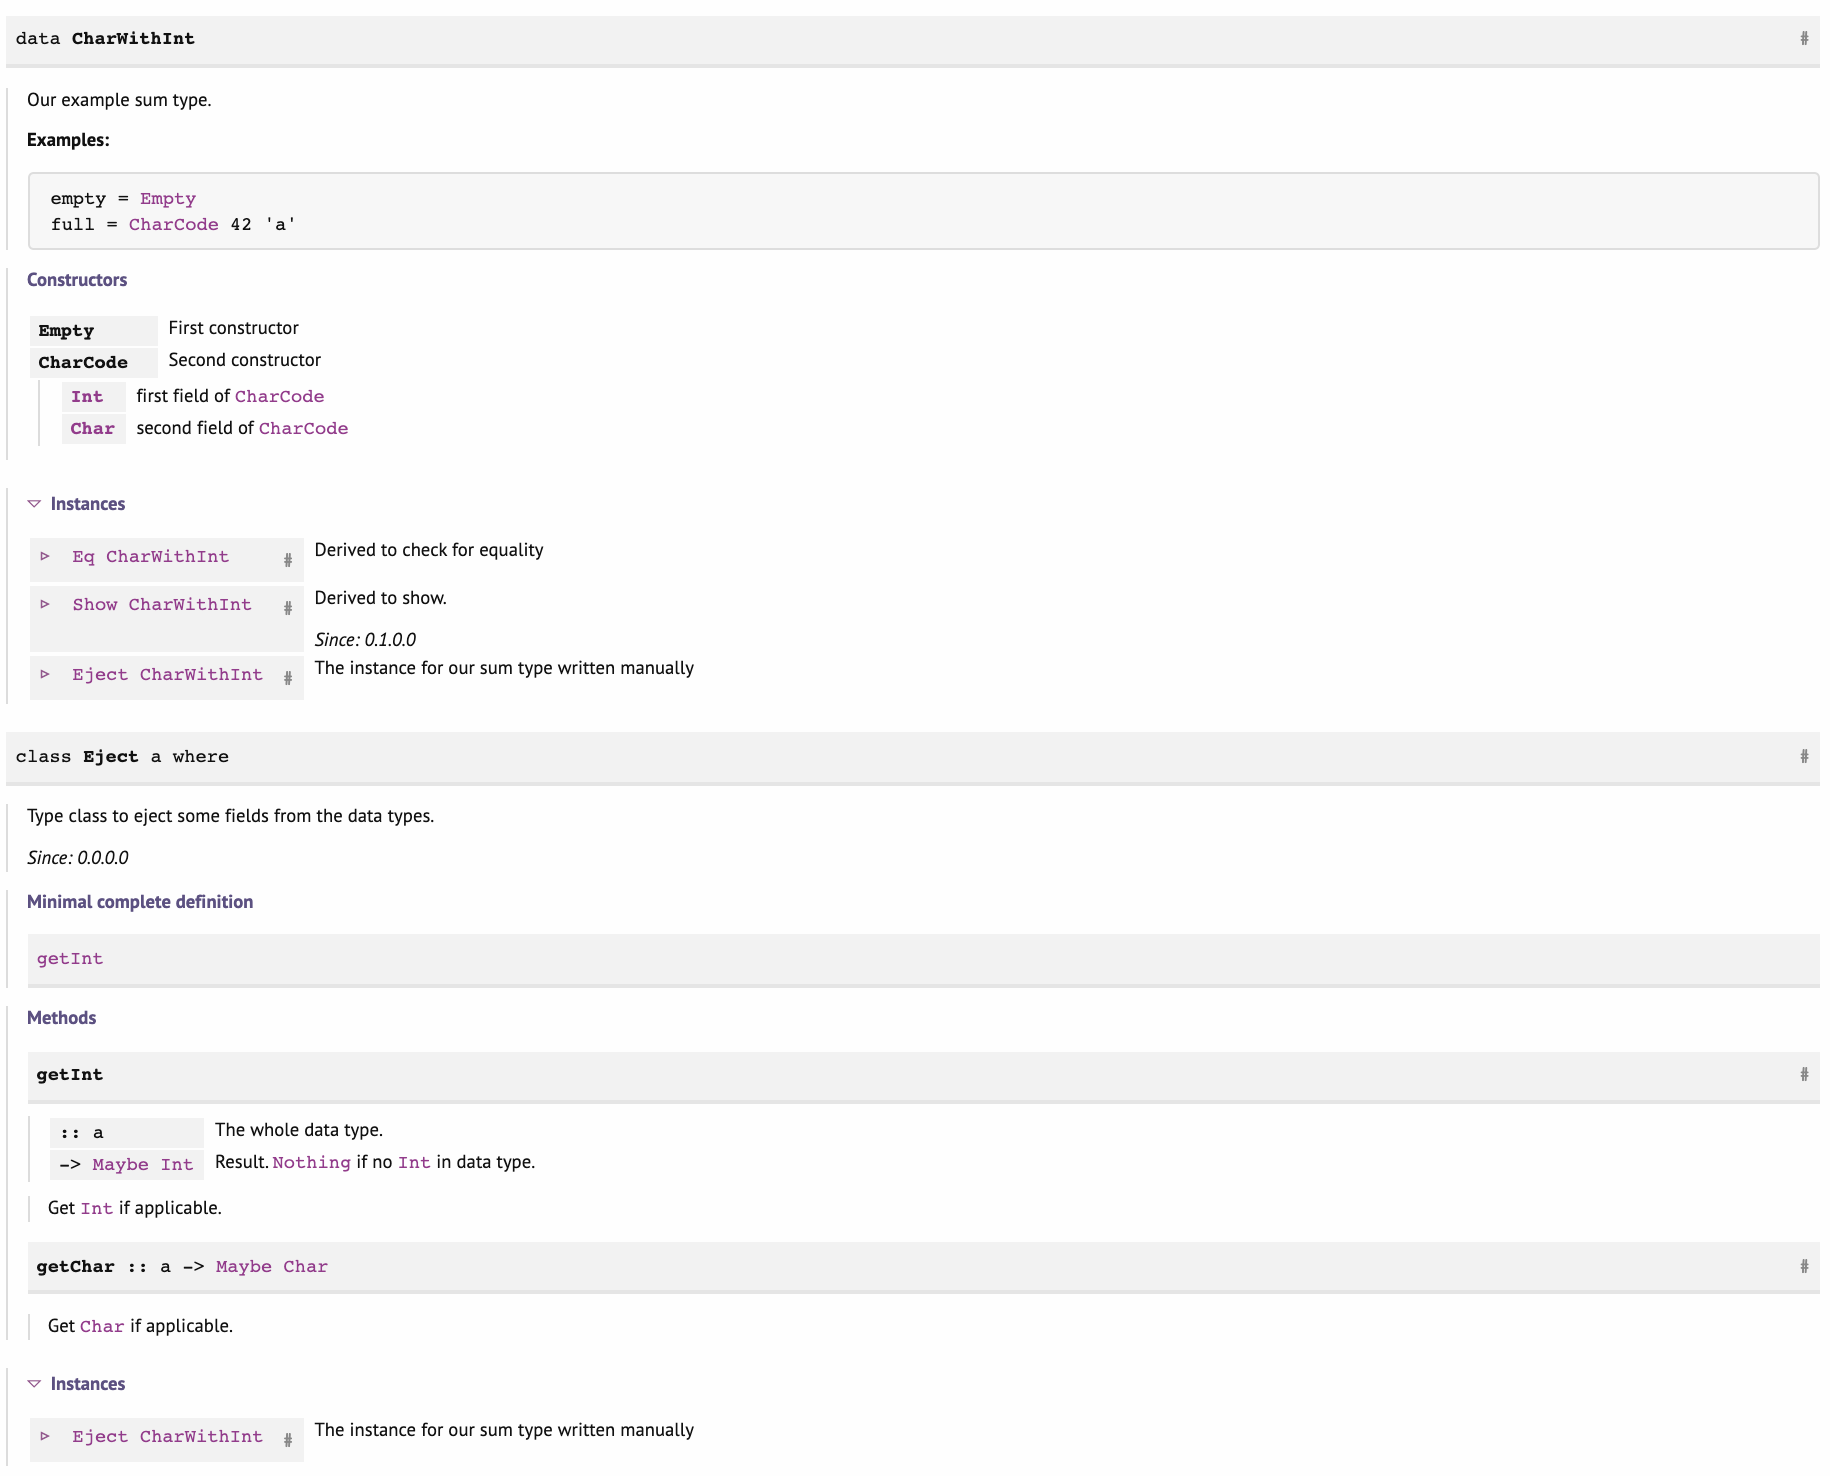
The below example showcases some Haddock syntax and features:
{- | Our example sum type.

__Examples:__

@
empty = 'Empty'
full = 'CharCode' 42 \'a\'
@
-}
data CharWithInt
    = Empty -- ^ First constructor

      -- | Second constructor
    | CharCode
        Int -- ^ first field of 'CharCode'
        Char -- ^ second field of 'CharCode'
    deriving stock
        ( Show  {- ^ Derived to show.

                 @since 0.1.0.0
                -}
        , Eq  -- ^ Derived to check for equality
        )

{- | Type class to eject some fields from the data types.

@since 0.0.0.0
-}
class Eject a where
   {-# MINIMAL getInt #-}
   -- | Get 'Int' if applicable.
   getInt
       :: a  -- ^ The whole data type.
       -> Maybe Int  -- ^ Result. 'Nothing' if no 'Int' in data type.

   -- | Get 'Char' if applicable.
   getChar :: a -> Maybe Char

-- | The instance for our sum type written manually
instance Eject CharWithInt where
    getInt :: CharWithInt -> Maybe Int
    getInt Empty          = Nothing
    getInt (CharCode i _) = Just i

    getChar :: CharWithInt -> Maybe Char
    getChar Empty          = Nothing
    getChar (CharCode _ c) = Just c
When documentation is built, it will look like on the screenshot below:
We don’t recommend using the Haddock comment syntax for other places where they cannot be applied by specification because this breaks Haddock. Even though the documentation states that such comments should be ignored, it is not what you would get on the output.
For example, the following innocent-looking Haddock results in the documentation error:
var :: Int
var = 42 -- ^ The answer
Haddock coverage:
src/BlogpostHaddock.hs:57:10: error:
parse error on input '-- ^ The answer'
|
57 | var = 42 -- ^ The answer
| ^^^^^^^^^^^^^^^
This issue will prevent the documentation appearing at Hackage and Stackage, which means that users won’t be able to read package documentation easily or search by the package in Hoogle.
Correct documentation looks like this:
var :: Int -- ^ The answer
var = 42
If you wanted to leave an ordinary (non-documentation) comment:
var :: Int
var = 42 -- The answer
We are not going to cover all annotation syntax. You can learn more from the official documentation. Instead, we will try to focus on best practices, advice and more explanation of suitability and usability of some various pieces of documentation on different levels.
Haddock Fishing🔗
As most of us are looking at the libraries’ documentation through Hackage/Stackage/Haddock or local options of the same format, we are going to cover each layer of the documentation on the page piece by piece from top to bottom and see how we can use 100% of each element.
Every page is responsible for one Haskell module and correspondingly reflects its structure, though in a user-configurable way (we will cover later the ways to take control over that). So, with respect to that, let’s start diving into the meaning of each and every documentation piece.
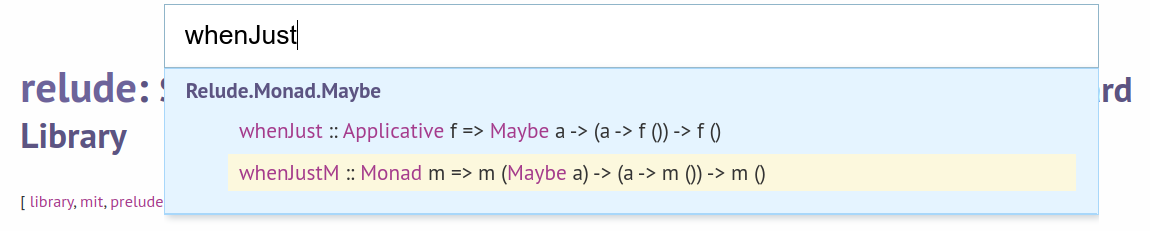
Though, sometimes you are interested only in specific types and functions, not in reading the full documentation. Hackage helps here as well. You can press the s button on a package page to quickly jump to definitions.
Top Level🔗
First thing you see on the module documentation page is this:

This whole information is taken from the top-level Haddock comment for the module. The comment is attached to the module construction in the source file. You can put extensions ({-# LANGUAGE ... #-}) and options (e.g. {-# OPTIONS_GHC ... #-}) either before the module header comment or after, but we recommend putting module Haddock comment closer to the module keyword itself, after all language extensions and module-specific options.
So the module layout may look like this:
{-# LANGUAGE ScopedTypeVariables #-}
{-# LANGUAGE TypeApplications    #-}

{- | ... Module header comment
-}

module MyModule (...) where
Top-level header info🔗
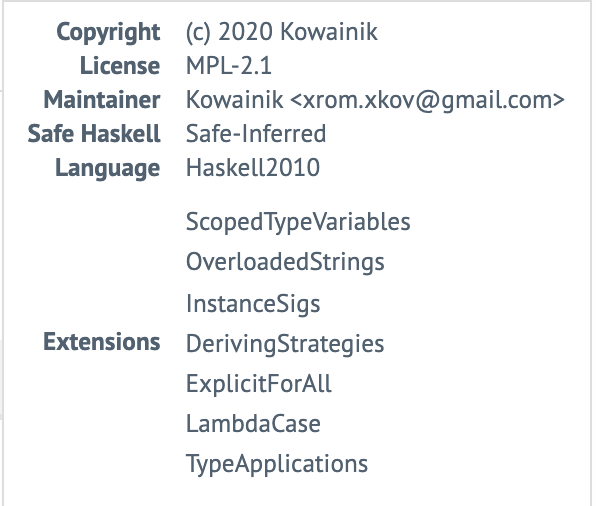
The meta-information in the border to the right is the result of special annotations at the beginning of the top-level Haddock. If it isn’t present in the file, then none will be shown in there (except for automatically determined info by the tool you are using).
These annotations include the following information:
Module– Module nameDescription– Short descriptionCopyright– Copyright note (preserves newlines)LicenseorLicenceorSPDX-License-Identifier– the name of the license used in the projectMaintainer– information about current maintainer, can include emailStability– experimental or stablePortability– portable or non-portable, but you can put anything basically. This field meaning is not strictly defined. Some people use it for OS-portability and write something like POSIX, Windows, portable. Other people mean “the Haskell compiler according to standard portability” and put “non-portable” here if a module uses GHC-only extensions.
Auto-filled, no manual fill-in is possible:
Safe Haskell–Safe,Trustworthy,UnsafeorNone(default)Language– Haskell report: 98 or 2010
All of the fields are optional, in free format and don’t have any requirements. Adding this header to each module is advisable.
👩🏫 You can use the headroom tool to create and update module headers automatically.
Additionally, you can put a special Haddock pragma {-# OPTIONS_HADDOCK show-extensions #-} at the top of your module before the documentation to also display all extensions enabled in this module. This feature can be helpful to quickly give an overview of required GHC features to work with the module API.
Top level module documentation🔗
The top-level module documentation is the first thing people see when they open a module. So it should describe the module exhaustively and set the mood of what to expect from it.
Because of that, we believe that It should describe clearly all necessary information, and must have the following:
- Top-level module header
- General high-level overview of the API
- Explanations on when to use and when not to use the module
- Usage examples
- If there are special requirements on how this module should (not) be imported, it must be clearly stated
The top-level documentation is not attached to any particular function or type. That’s why it gives an excellent opportunity to describe general concepts, draw the big picture, compare different options and provide an overall summary without diving into details of each entity of the module.
Arrange export lists🔗
Types and functions appear in the documentation according to the order they are specified in the export list of each module. It is good to mention now that in Haskell, exports of the module can be written explicitly in the module construction manually. Though, Haskell also allows you not to specify export lists at all. In this case, it is considered that such a module exports every function, type, etc. that it has.
Considering this, we can state that it is crucial to write your exports explicitly. Doing so gives you control not only over exported content but also over the documentation layout, which is quite as important. A clear export list helps to have more predictable documentation output where you can structure the information the way you want, aside from other benefits.
When users read the module documentation for the first time, they most likely browse the page scrolling from top to bottom. This fact should be taken into consideration when you start customising the structure of the export list, so you can put accents on the most important parts and make it comfortable to look through.
Table of Contents🔗
One of the improvements that could help users navigate your documentation easily is having a structured Table of Contents (ToC) for the module. It can be done in Haddock using the Sectioning feature.
Here is an example of how such detail could improve the understanding of your module. From just a look at the Contents of the main Prolens module of the prolens library we already can have an idea of the different interfaces that it provides, such as Lenses, Prisms and Traversals); And the structure guides about where to look for functions or operators related to the particular concept.
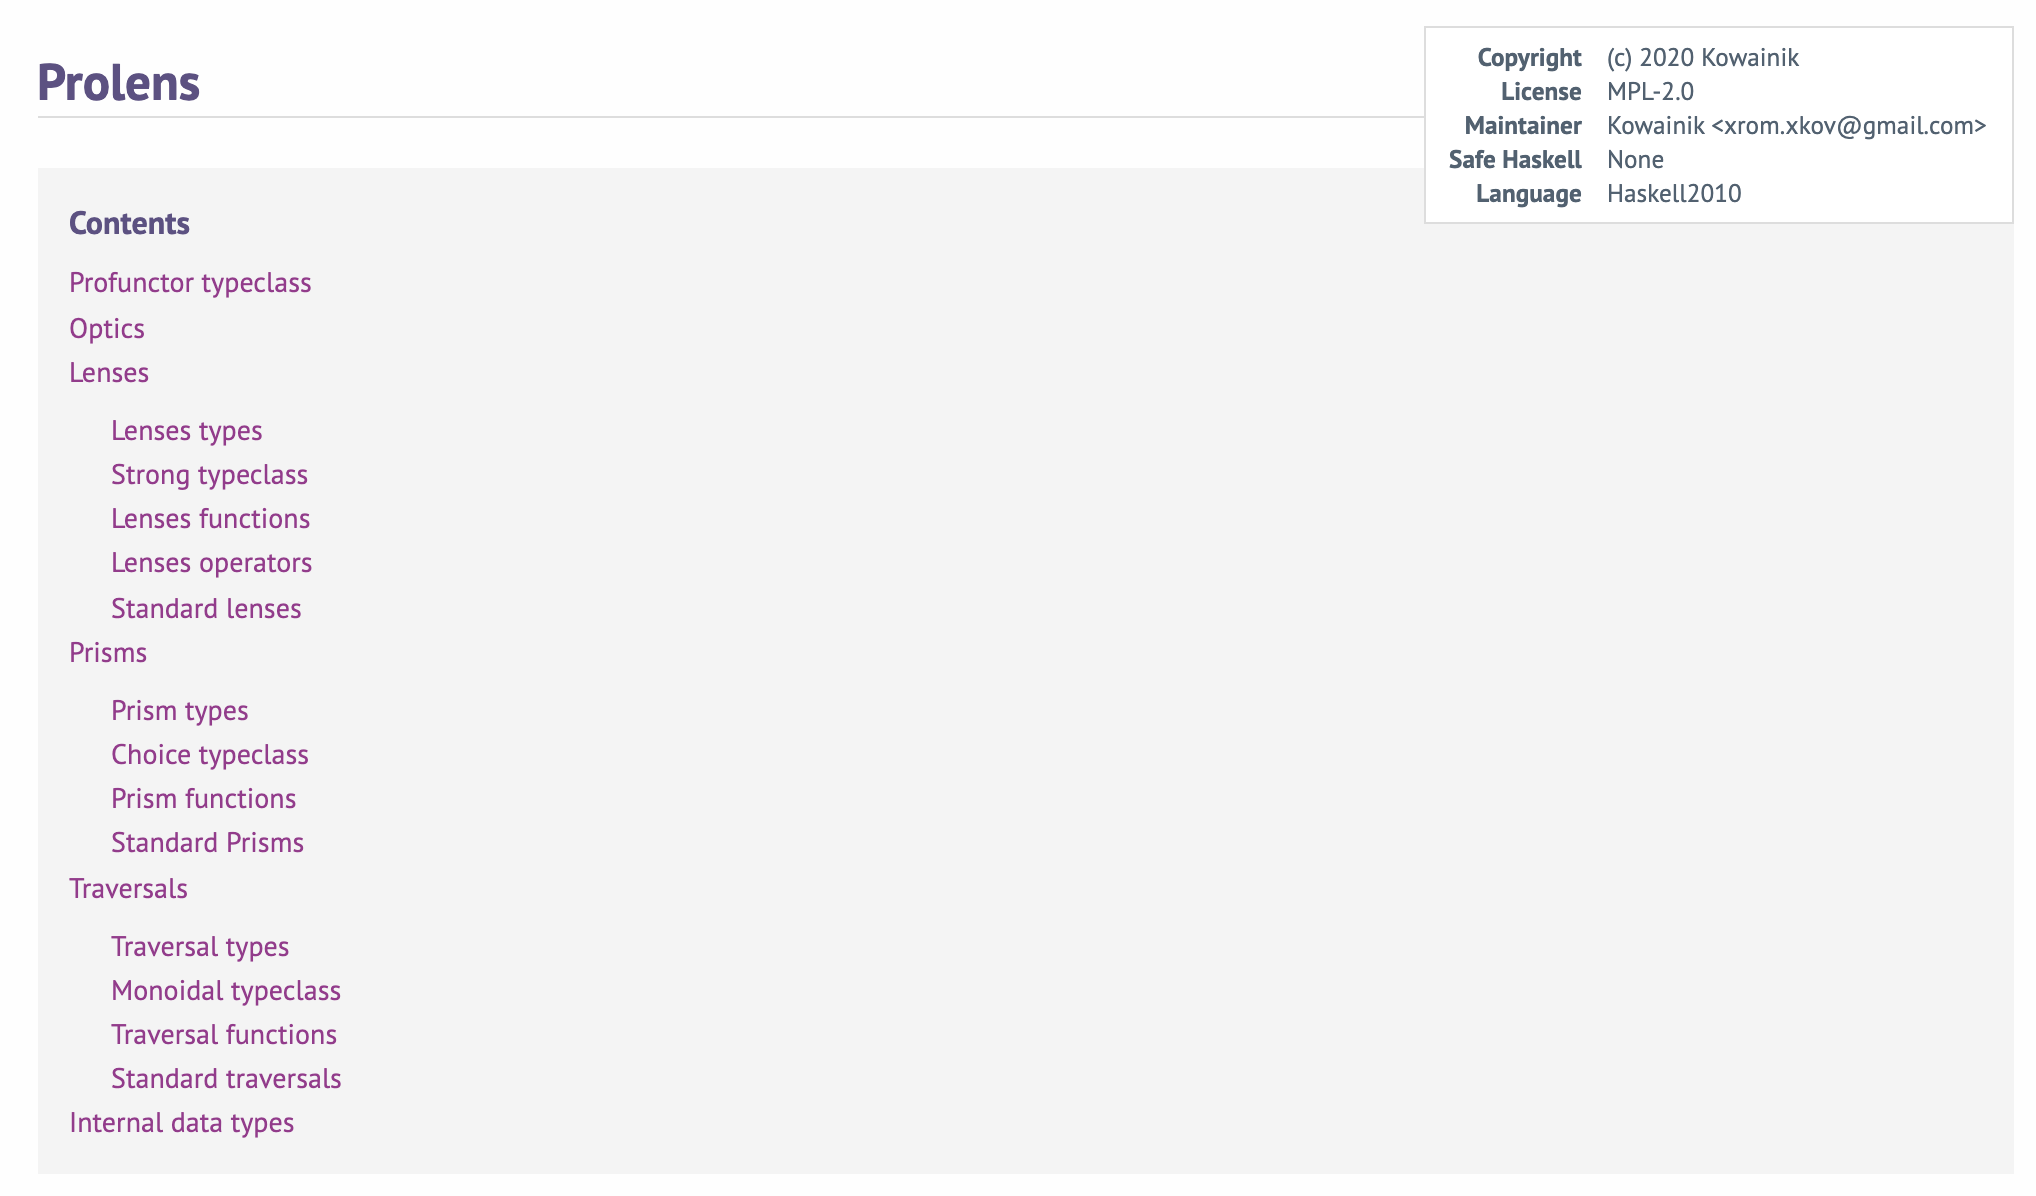
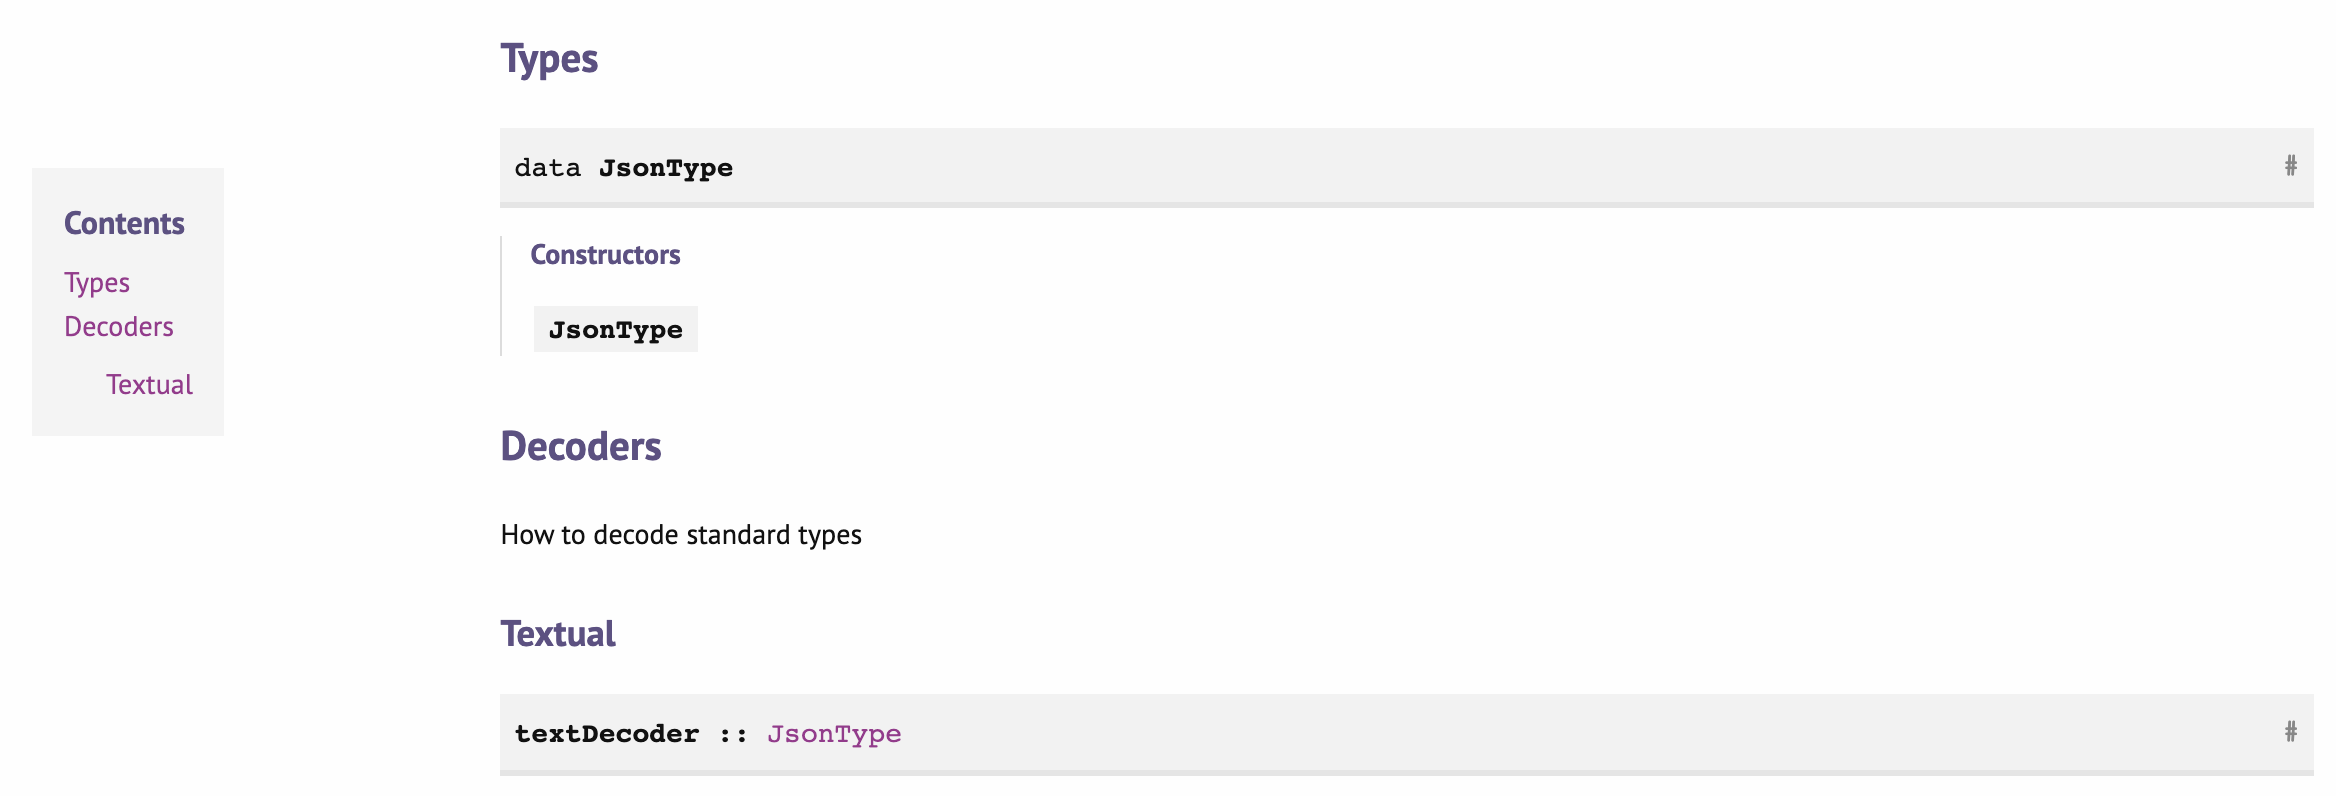
To organise your documentation like that, you can use Sections Headings with the * symbols. You can also add the inline description of the sections which will be shown in the section before the documentation for each element in there.
module Json where
    ( -- * Types
    , JsonType (..)
      -- * Decoders
      --
      -- | How to decode standard types

      -- ** Textual
    , textDecoder
    ...
    )
Named doc chunks🔗
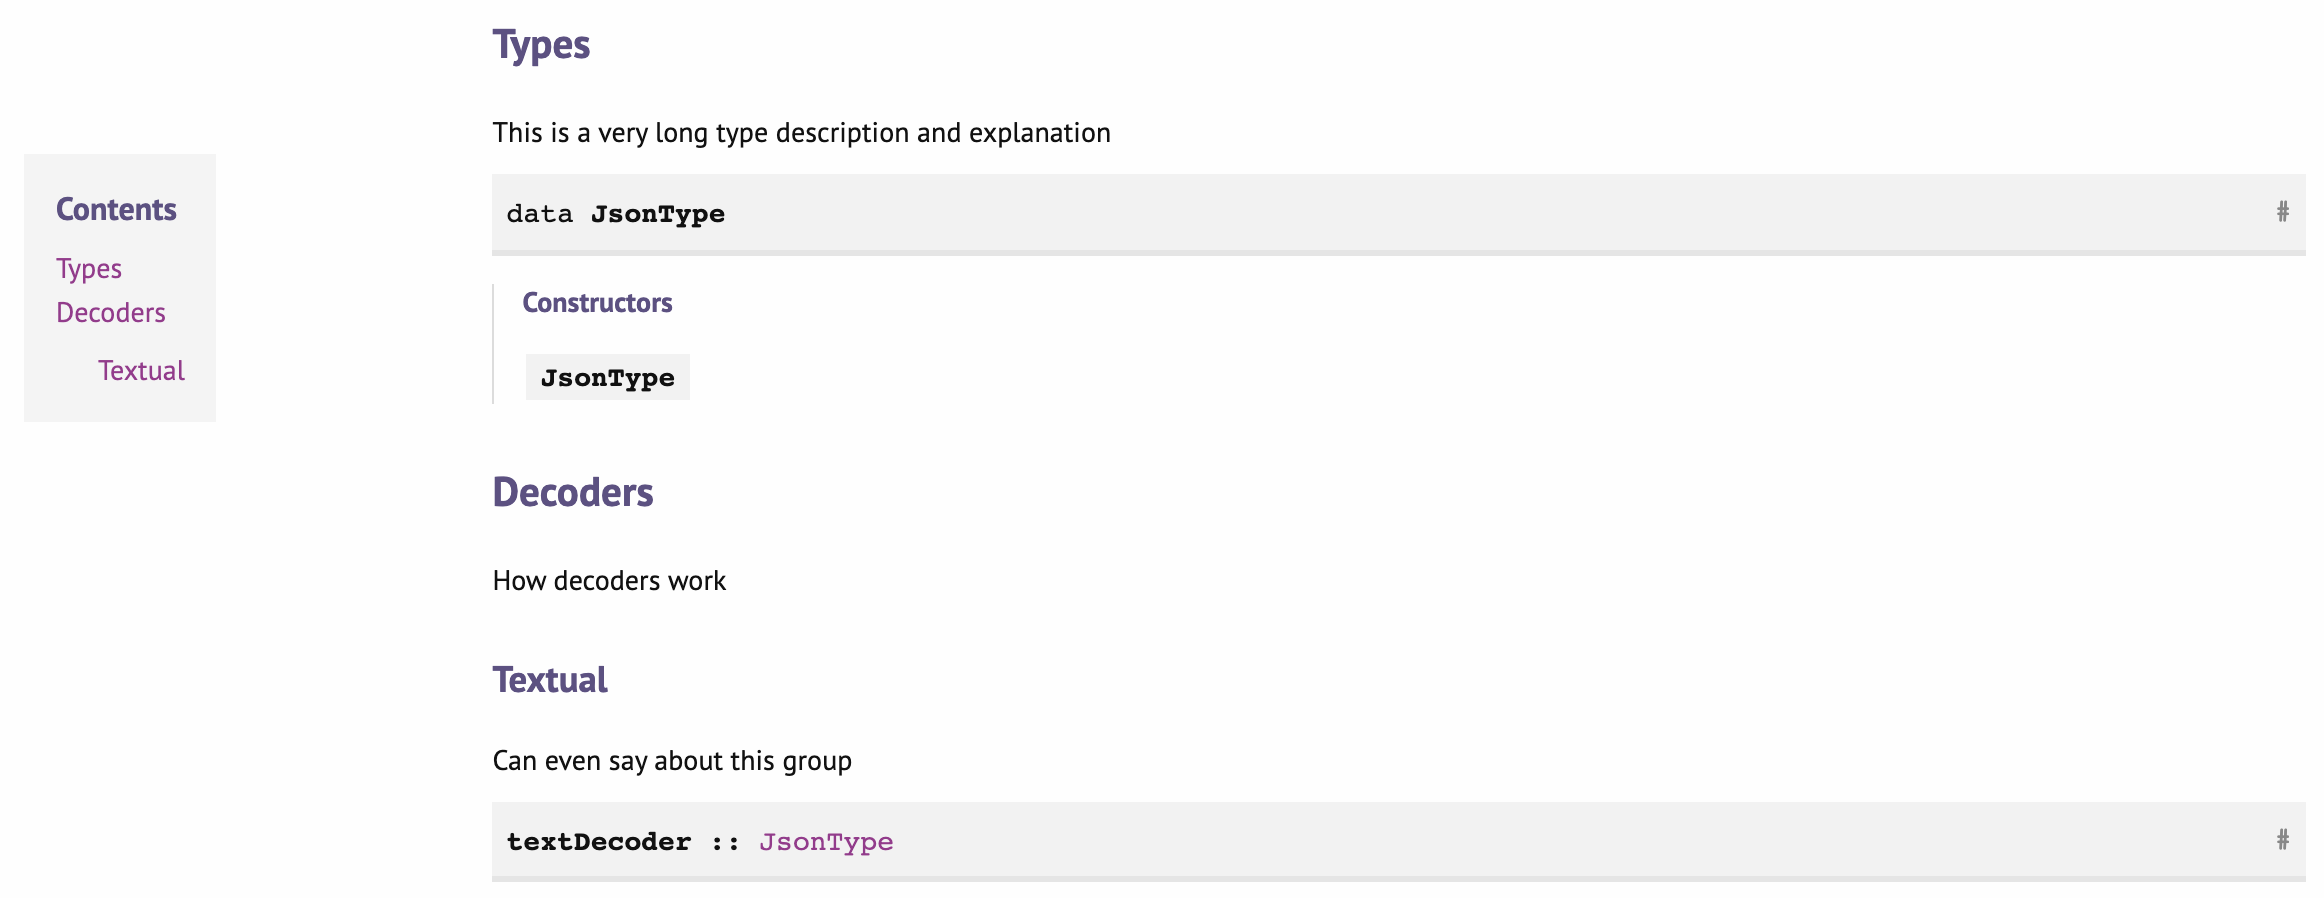
ToC works fabulously for your documentation. You can notice that each section’s inline description can potentially contain a lot of useful information and be quite agglomerated because of that. However, it quickly can become messy and make the header of the module repulsive for the developers and maintainers themselves. It can even prevent maintainers from writing descriptions full of important details and explanations to the grouped elements only not to mix documentation and code. Haddock has a solution for this: named documentation chunks.
This feature allows putting the whole documentation block in a separate place and then referring to it by name.
module Json where
    ( -- * Types
      -- $type
    , JsonType
      -- * Decoders
      -- $decoders
      -- ** Textual
      -- $text
    , textDecoder
    ...
    )

... All module content ...

{- $type
This is a very long type description and explanation
-}

{- $decoders
How decoders work
-}

{- $text
Can even say about this group
-}
Though be aware that this feature allows using named chunks only in the export list, but not in the documentation for functions and types. It would be so much better if the scope of this feature would be expanded to all places where you can write Haddock comments! Admittedly, there’s an open feature request in Haddock about this.
Exports best practices🔗
We want to share a few suggestions on how to write the best documentation for exports:
- Always write explicit and well-formatted (for your taste) export lists (e.g. do not put everything on one line).
- Put all relevant types before functions of those types. Lots of people actually read types to get the idea of how the interface is working.
- Use sections and subsections.
- Group sections logically (e.g. group the Set type and Set functions in the same block, and Map type and Map functions in another).
- It’s rarely better to sort exports alphabetically (unless you have functions that represent each alphabet letter). Though for some small chunks/sections of export, it doesn’t matter so much, so alphabetic order can be used there for ease.
- Use named documentation chunks to provide more context for each group.
All the above worked very well for us, and we recommend it to all libraries.
Here is a verbose example of the export list from the validation-selective library:
module Validation
    ( -- * Type
      Validation (..)

      -- * How to use
      -- $use

      -- * Interface functions
    , isFailure
    , isSuccess
    , validation
    , failures
    , successes
    , partitionValidations
    , fromFailure
    , fromSuccess

      -- ** 'NonEmpty' combinators
      -- $nonEmptyCombinators
    , failure
    , failureIf
    , failureUnless

      -- ** 'Either' conversion
      -- $either
    , validationToEither
    , eitherToValidation

      -- * Combinators
    , validateAll

      -- ** When* functions
    , whenSuccess
    , whenFailure
    , whenSuccess_
    , whenFailure_
    , whenSuccessM
    , whenFailureM
    , whenSuccessM_
    , whenFailureM_

      -- ** 'Maybe' conversion
    , failureToMaybe
    , successToMaybe
    , maybeToFailure
    , maybeToSuccess
    ) where

...


{- $use
...
-}

{- $nonEmptyCombinators
...
-}

{- $either
...
-}
Import only modules🔗
Often, when writing a library, you split it into multiple modules. When you structure your modules with specific implementation details in each, you usually can end up with the deep hierarchical structure, which in Haskell means long module names. For users’ comfort, it’s desirable to provide shorter-named modules.
One of the standard things for library API is to create a special short-named module (ideally it should have the same name as your package for convenience) that imports other modules with all the essential API. Such import-only modules usually don’t contribute any new code. They serve the purpose of reexporting necessary library API and presenting it in a more digestible way.
We use this approach a lot in the tomland library. We have several import-only modules there. The main Toml module reexports everything, so users need to write only a single import line import qualified Toml in order to have access to everything. Besides that, we also group logical modules into subgroups using imports-only super modules. Here is a short example of such a module:
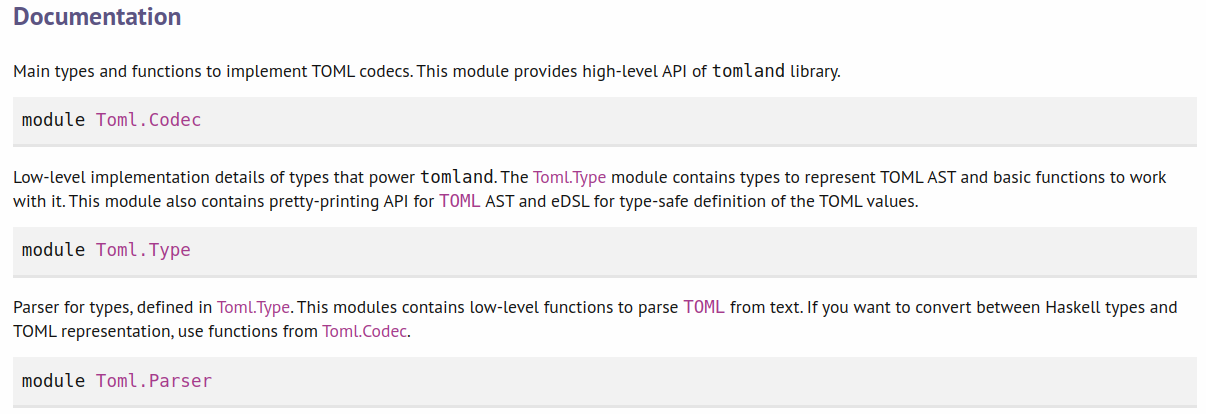
We have a few tips on how to utilise documentation for such modules and make them shine maximally:
- Write the top-level description of the module, explaining what this group of reexported modules does and provide relevant examples.
- You can rearrange reexported modules for better clarity to guide users through your API smoothly (you don’t need to export modules alphabetically).
- Add named documentation chunks to provide the necessary context for each module import or each logical group (see exports arrangement section).
- Sometimes it’s better to reexport the whole module, sometimes only a few functions and list them explicitly in the export list. Use your judgement on how to present your API in the most convenient way for users.
Tables🔗
A lot of information can be conveyed greatly with tables! Here is a great example of textual types conversion functions from the relude library presented as a table:
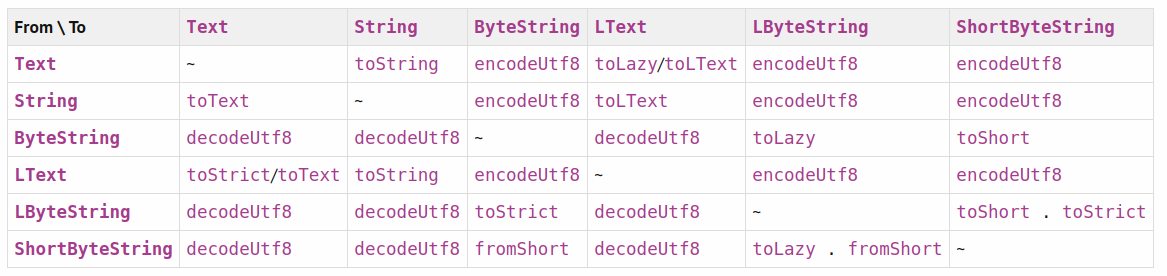
Tables in Haddock are grid-like tables where the layout is defined by “ASCII art”. See the official documentation about tables to learn about their syntax.
Despite bringing a lot of joy to users who read tables and people who love to create tables (guilty as charged), writing tables can be painful as the format is space- and layout-sensitive, so even any tiny change leads to the complete table restructure. You can use this site to create tables easier.
In addition to having a challenging way to write tables and long debugging times, there are a few more facts. Whenever you have an idea for a suitable table in your documentation, to save you a lot of time, here is something to watch out for; we were caught on the following annoying Haddock bugs:
- If you write a table directly after the header section, it won’t be rendered because of the Haddock bug.
- You may want to put tables not only in Haddock, but also in your README, but Hackage currently doesn’t render tables from markdown README files.
ASCII as documentation art🔗
The goal of the documentation is to give a comprehensive picture to your user and/or folk working on the same project. Therefore, it makes sense to use any accessible option to make use of any tool at your elbow. One of the versatile yet straightforward instruments is a graphical representation of some ideas of the function via ASCII.
Here are a few examples of ASCII-ar documentation in the wild.
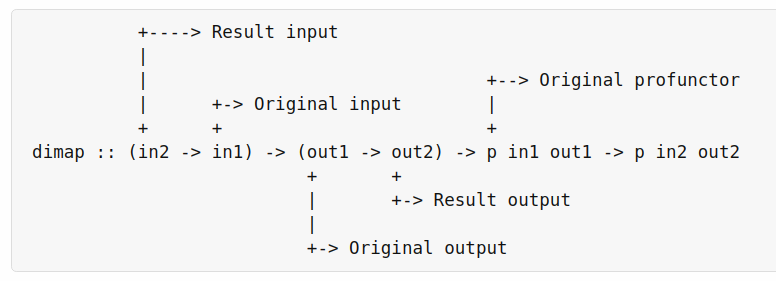
You can see that the diagram is simple, but it has a significant effect on understanding the type and what each part of it is responsible for.
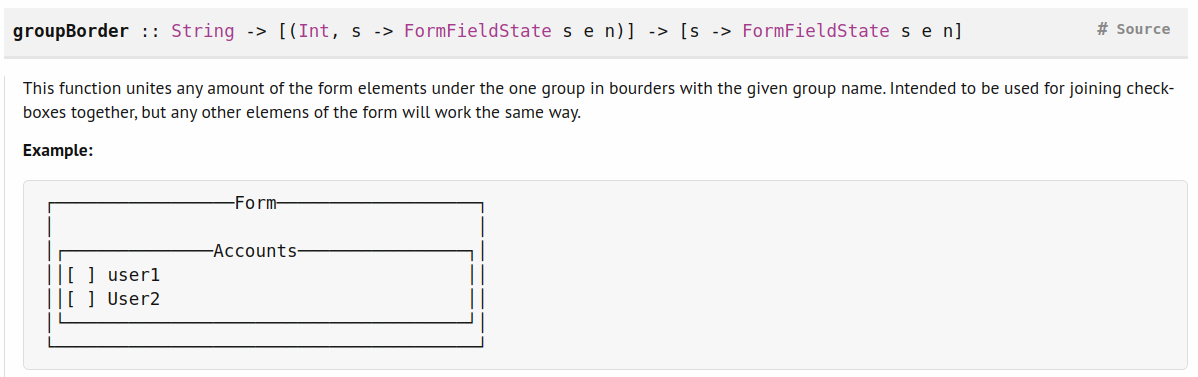
Here it is used to showcase the rendered output of borders in TUI.
Use your imagination to figure out what else could be done with ASCII, but it is clearly one of the easiest instruments that helps improve the documentation.
Moreover, if you want to easily draw some arrows, diagrams and so on with ASCII, there are even plenty of online tools which could help to handle it easily.
It is fair to mention that Haddock does support images as part of the documentation. And there are a bunch of use cases for that. You can see how useful it is for the rendering libraries, like reanimate:
However, we do not suggest using the images feature heavily. The reason for that is that such documentation is not that stable when you develop a package. But as we know, Haddock is the instrument not only for users but for suppliers as well. Also, documentation has a burden of maintenance, you should keep that up-to-date, and there is no automatic way of that. Reasonably, it is not applicable if you are writing an image library, but even in that case, it would be great to have some mechanism to test images on obsolescence. However, in cases of simple schemes and anything doable with ASCII, it is better to prefer the latter.
Expandable examples🔗
We think that the examples are the essential, and probably the most valuable, part of the documentation. Examples could be different:
- The function usage example, which clarifies how the function is mostly used
- An example of the situation where the function can be used
- Illustrations of some corner cases
- The GHCi examples that show how the function behaves on the different inputs
Though usage samples are valuable, sometimes they require a lot of preliminary explanations and context. That is why some examples could be massive and can contain a lot of text and code. In order to not pile up the precious documentation page, independent examples and use-cases can be put in a special expandable section of the Haddock comment. The syntax is the following:
{- |
==== __Examples__

Now you see me

>>> foo + bar 1
53
-}
By default, Haddock hides such sections, but you can expand it by clicking on the triangle ▶ icon:
This feature gives implementers more flexibility and control over the on-page appearance of the module. It helps to prioritise information and provide a compact way to fit the vital information, putting some additional parts outside. With this feature, you can provide necessary details only to users who are interested in specifics of some functions. And other people can quickly scroll past these irrelevant details.
Doctest🔗
The main curse of the documentation is that it becomes obsolete with time if not maintained properly. Haddock decided to help developers with this problem by putting the documentation near the code itself so that you can update both at the same time. But that is not the only helper for Haskell in the wild. What about tests for your documentation?
doctest is an invaluable tool for testing your documentation. We mentioned earlier that providing examples to functions is super helpful. But having proof, that examples are not outdated and work as advertised, is even better!
Doctest is a Haskell library that performs testing of code snippets from your documentation. To do this, you need to prefix each example with triple arrows >>> from the line start and write the expected output (if any) on the next line. Like so:
{- | Monadic version of 'unless'.

>>> unlessM (pure False) $ putTextLn "No text :("
No text :(
>>> unlessM (pure True) $ putTextLn "Yes text :)"
-}
unlessM :: Monad m => m Bool -> m () -> m ()
unlessM p m = p >>= flip unless m
And then, if you implement the doctest test-suite, the tool will check your code and error on any discrepancies.
As this is another test suite, it could be checked during the CI/CD process and all errors due to the outdated doc examples could be caught before the release.
We strongly recommend using doctest for your code as much as you can!
Small Haddock baits🔗
The previous section explains some high-level and general recommendations. This section, in turn, provides smaller tips and tricks to improve the look and feel of your documentation.
Module links, functions links etc.🔗
Haddock allows linking to other exported definitions from documentation, and this is a powerful feature!
To link to some specific module, take into double quotes, like so:
-- | This function works best with types from "MyLibrary.MyModule".To link to some specific function or type, take it into single quotes:
-- | Function 'foo' takes values of type 'MyType'.It is a really helpful feature because people who are not familiar with all types and functions can simply jump to definitions and read about them when necessary.
You can also use links (as well as other Haddock formatting) inside code blocks to make them look prettier. See the example below:
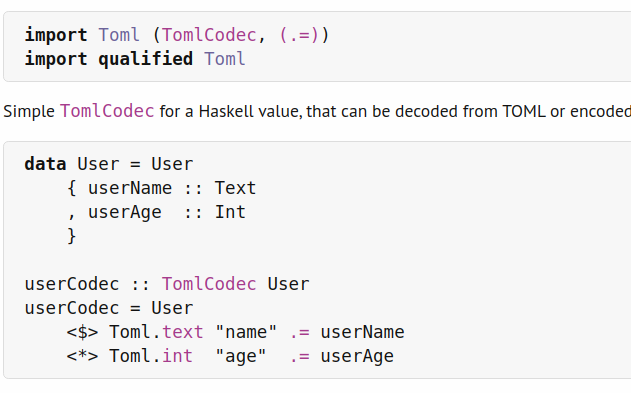
Here, we use keyword highlighting, module and functions links to make it more readable and help users to understand the example better.
Anchors🔗
Haddock also allows you to mark anchors on the documentation page. You could link to them within the documentation with #anchor in the module or with Module-Name.html#anchor from other modules (don’t believe the documentation, it lies).
It could be quite handy in the situation where you can link to some broad explanation already covered somewhere in your docs, but applicable and helpful for the better understanding of a concrete function. For instance, like the following situation:
{- |

...
#algorithm#
Algorithm description.
-}

... some functions ...

{- | The main algorithm runner.

See [this description](#algorithm) for more details.
-}
run :: IO ()@since🔗
Haddock supports special @since annotations that indicate the package version in which this type, function, argument, or even the whole module first appeared. This is invaluable information for users, as they can specify the library bounds more precisely depending on what functions they use and refer to the correct documentation, which corresponds to the interested version.
It looks like this in the code:
{- | Decode JSON and return errors inside a list.

@since 2.0.3.2
-}
And then it will be visible in Haddock.
While developing, you might not know in advance what version will be next, because according to PVP, the next version number depends on the changes you perform. So, during the development mode, you can write @since x.x.x.x and then replace all such strings with the exact next version when it’s time to release the new version.
👩🏫 If you are unsure what version should be next, tools like policeman can help with that.
Escaping🔗
Sometimes Haskell syntax and Haddock annotation syntax have some overlaps which make writing documentation for your functions a tough task. Specifically, some characters that are allowed to be in operator definitions, also have a different meaning for the Haddock tool. Because of that, you may have hard times seeing your documentation rendered incorrectly (especially if you notice that only after the release).
Haddock prints warnings for some errors when you build the documentation (e.g. link to a non-existent type of function), but it doesn’t warn you if some documentation is not rendered correctly. So, you still need to check your generated docs and verify they look as expected.
For instance, you can’t simply write the Functor’s fmap operator as <$> in the documentation and expect it to give a link to the specified function. You need to escape symbols like this:
{- | Use functor operator @\<\$>@
-}
Though, if you link to it using single-quotes, you don’t need to escape characters, and you can even link operators inside parentheses (e.g. '(<$>')) but this wasn’t always the case.
To see the entire rules set of escaping, you can check out what the official documentation says about it.
Challenge time!🔗
Can you fix the following comment to make it look pretty when rendered?
{- | To use operators @(<*>)@ and 'Control.Category.(>>>)',
enable extension {-# LANGUAGE RankNTypes #-}
and export 'Lens\'' type. After that, you can do something like this:

@
set userL "Alex" myUser
@
-}Answer:
{- | To use operators @'(<*>)'@ and '(Control.Category.>>>)',
enable extension @\{\-\# LANGUAGE RankNTypes \#\-\}@
and export 'Lens'' type. After that, you can do something like this:

@
'set' userL \"Alex\" myUser
@
-}
A few notes:
- Escape or link operators with
<or> - Escape nested brackets, especially for language extensions
- Use proper syntax for parenthesising operators
- Remember proper escaping rules for single quotes
- Escape string literals started with the uppercase to avoid unintentional linking to modules
Fixity of operators🔗
Operators in Haskell have precedence that tells the compiler how to group operations. Because of that, if you write 1 + 2 * 3 you get the result 7 and not 9 (or compiler error). If you don’t specify the fixity explicitly, it is set as infixl 9 by default. But you can configure it by using the special Haskell syntax for that, e.g. infix 5 .% or infixr 8 ^.^, *&. Haddock adds this information to the operators’ documentation, so it is important to take care of it.
For older versions of Haddock, fixity annotations had a special meaning. When you tried to go to sources of your operator with custom fixity from the generated documentation (there is a useful Sources hyperlink in Haddock), you were sent to the fixity declaration, not to the operator definition itself. That is why it’s essential to put a fixity declaration before the operator. Also, you will have all information about the operator near each other. Like so:
{- | This operator composes functions. It's similar to '.' but with
flipped arguments and arrows showing the direction of function
application. So the good old:

@
renderUserId :: User -> Text
renderUserId = truncate '.' render '.' userId
@

can be rewritten as

@
renderUserId :: User -> Text
renderUserId = userId '>>>' render '>>>' truncate
@
-}
infixr 9 >>>
(>>>) :: (a -> b) -> (b -> c) -> (a -> c)👩🔬 If you use Stan (Haskell static analyser), it will warn you on missing explicit fixity declarations.
Haddock + CPP🔗
Some examples might work differently (or not work at all) on all operating systems and GHC versions. Because of this, you may want to test and show them conditionally by using the CPP Haskell extension. Unfortunately, when used straightforwardly, the combination of Haddock and CPP may not always work.
Specifically, CPP comments are stripped to empty lines during the phase of the compilation process, and parsed sources do not have irrelevant lines that are under a non-suitable case of CPP. And as such lines are empty, these comments don’t work with per-line comments:
-- ☹️ incorrect

-- | A file path to document.
--
#ifdef mingw32_HOST_OS
-- >>> docPath
-- C:\Documents\Doc.doc
#else
-- >>> docPath
-- ~/Documents/doc
#endif
docPath :: String
The solution for this case is simple – use block multiline comments instead:
-- 🙂 correct

{- | A file path to document.

#ifdef mingw32_HOST_OS
>>> docPath
C:\Documents\Doc.doc
#else
>>> docPath
~/Documents/doc
#endif
-}
docPath :: String
But generally watch out of such documentation blocks as the irrelevant information is not preserved after the compilation.
.cabal and Haddock syntax🔗
Before, we were only speaking about single module-level documentation. But if you look at Hackage, you can see that the package itself contains a lot of meta-information.
All this information is provided through the project special files – .cabal files – that describe the package as it is.
Besides a lot of specific information, it contains the package description. Let us explain the relation: the .cabal description` uses Haddock like syntax, so you basically can use any of the Haddock element to put to the description of your package: tables, sections, code snippets, examples, anything, which gives a lot of opportunities to “sell” the package and show-off its capabilities straightaway.
Here are a few examples:
See also, that each package have links to all exposed modules, and these pages look like we describe above.
Haddock CLI commands🔗
Haddock is a CLI tool. It has several useful options that could be helpful in different situations. As we mentioned, we suggest using Haddock through the build tool of your choice. For example, to build the documentation locally with cabal-install, use the following command:
cabal haddock --enable-documentationRead more about other commands to generate and upload Haddock documentation in the following blog post:
Haddock warnings🔗
When you build the documentation, Haddock also reports useful statistics:
- Documentation coverage
- Functions with missing documentation
- Errors in documentation (broken links to functions, ambiguous references, etc.)
The output looks like this:
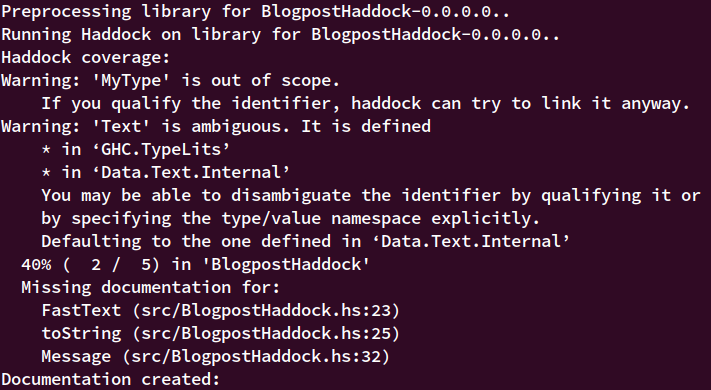
It doesn’t report all the problems you may have with rendering, so we still recommend checking your documentation before each release.
Wishes🔗
Haddock is a fantastic tool! You can already improve the quality of your documentation significantly by using existing Haddock features. But even Haddock itself can be improved a lot to allow writing even juicer documentation.
We thought a bit about various ideas that we would love to see in Haddock one way or another. Here is our wish list for all features (some small and some big):
Automatic code highlight in code sections
@ @Expandable sources – but this contradicts Haddock goals, specifically:
The documentation should not expose any of the structure of the implementation,
Tables with multiline strings and code blocks inside
Automatic check of all broken links
Easier way to link to packages from Hackage: you can link to a module or a function by using double or single quotes, but you need to specify the full URL to package on Hackage or Stackage
Automatic
@sinceannotations. For now, you need to write them manually, but it would be so great if Haddock could calculate the semantic diff between versions and annotate functions automatically. This is something that is already possible with the HIE files. See policeman for the working proof-of-concept.
These all are non-existing things at the moment, but if you see potential in any of these options, let us know, or even try to push the discussions about them in the Haddock tracker!
We would appreciate that.
Conclusion🔗
Writing documentation is not an easy job. Writing good documentation is much harder than that. But we hope that these notes and tips could help you to improve most easily. You can contribute these enhancements to the libraries that you use, which are needed in some changes to be more friendly or intuitive.
Let’s not wait for the brighter future, let’s build it by ourselves!
Links🔗
- Official Haddock documentation
- Haddock Cheatsheet
- Haddock Cheatsheet Package
- Haddock Mistakes
- How I read Haskell documentation
- Hackage: standalone-haddock
Meme shelf🔗